How to embroider a large design on a small home embroidery machine
A 100 × 100 mm hoop does not stop you from sewing a large design. Here is how to split an 80 × 147 mm picture into two parts, line them up, and know when not to bother.
Most small home embroidery machines use a 100 × 100 mm hoop. That number decides what you can sew in one pass. A shirt-back design is often 250 mm wide. The machine can stitch it. The hoop cannot hold it.
The practical answer is to split the design into parts, sew them one at a time, and line each part up from a printed placement sheet. EasyEmbroid (easyembroid.com) does this in the browser. Upload the picture, choose your machine, and set the finished size. Then download the parts, the placement sheet and the sewing guide.
The case below ran on a Brother M370. The same process applies to the other small machines listed in the next section.
What does a 4 × 4 hoop actually limit you to?
The limit is the embroidery field. A 4 × 4 machine has a 100 × 100 mm field. You can sew a design that fits inside roughly 90 × 90 mm in one hooping. A wider or taller design needs more than one pass.
The 100 × 100 mm group includes the Brother M370 / M370M, M330E / M330EM, M380D / M380DM, SE700, SE600 and Skitch PP1. The Feilu FL9860 / FL9870 uses the same field. Slightly larger home models such as the Janome Memory Craft 350E use a 140 × 200 mm field. The process is the same. Only the part count changes.
EasyEmbroid keeps these models in its machine list, so the plan uses the real field for each one. If your model is not listed, you can enter the field yourself.
Why does shrinking the design not solve it?
When you shrink the design, the machine has less space for the same details. Thin lines fall below what the needle can form cleanly. Small lettering closes up. Two small shapes can merge into one.
Check the artwork at the finished size, not at the size it appears on your screen. In this case, the 250 mm plan needed 18 parts. The 80 mm plan needed 2. The smaller size only worked because the artwork changed first: EasyEmbroid's AI redraw turned the photo into flat colour artwork, and the suitability score rose to 88 out of 100. The report said "Ready to stitch."
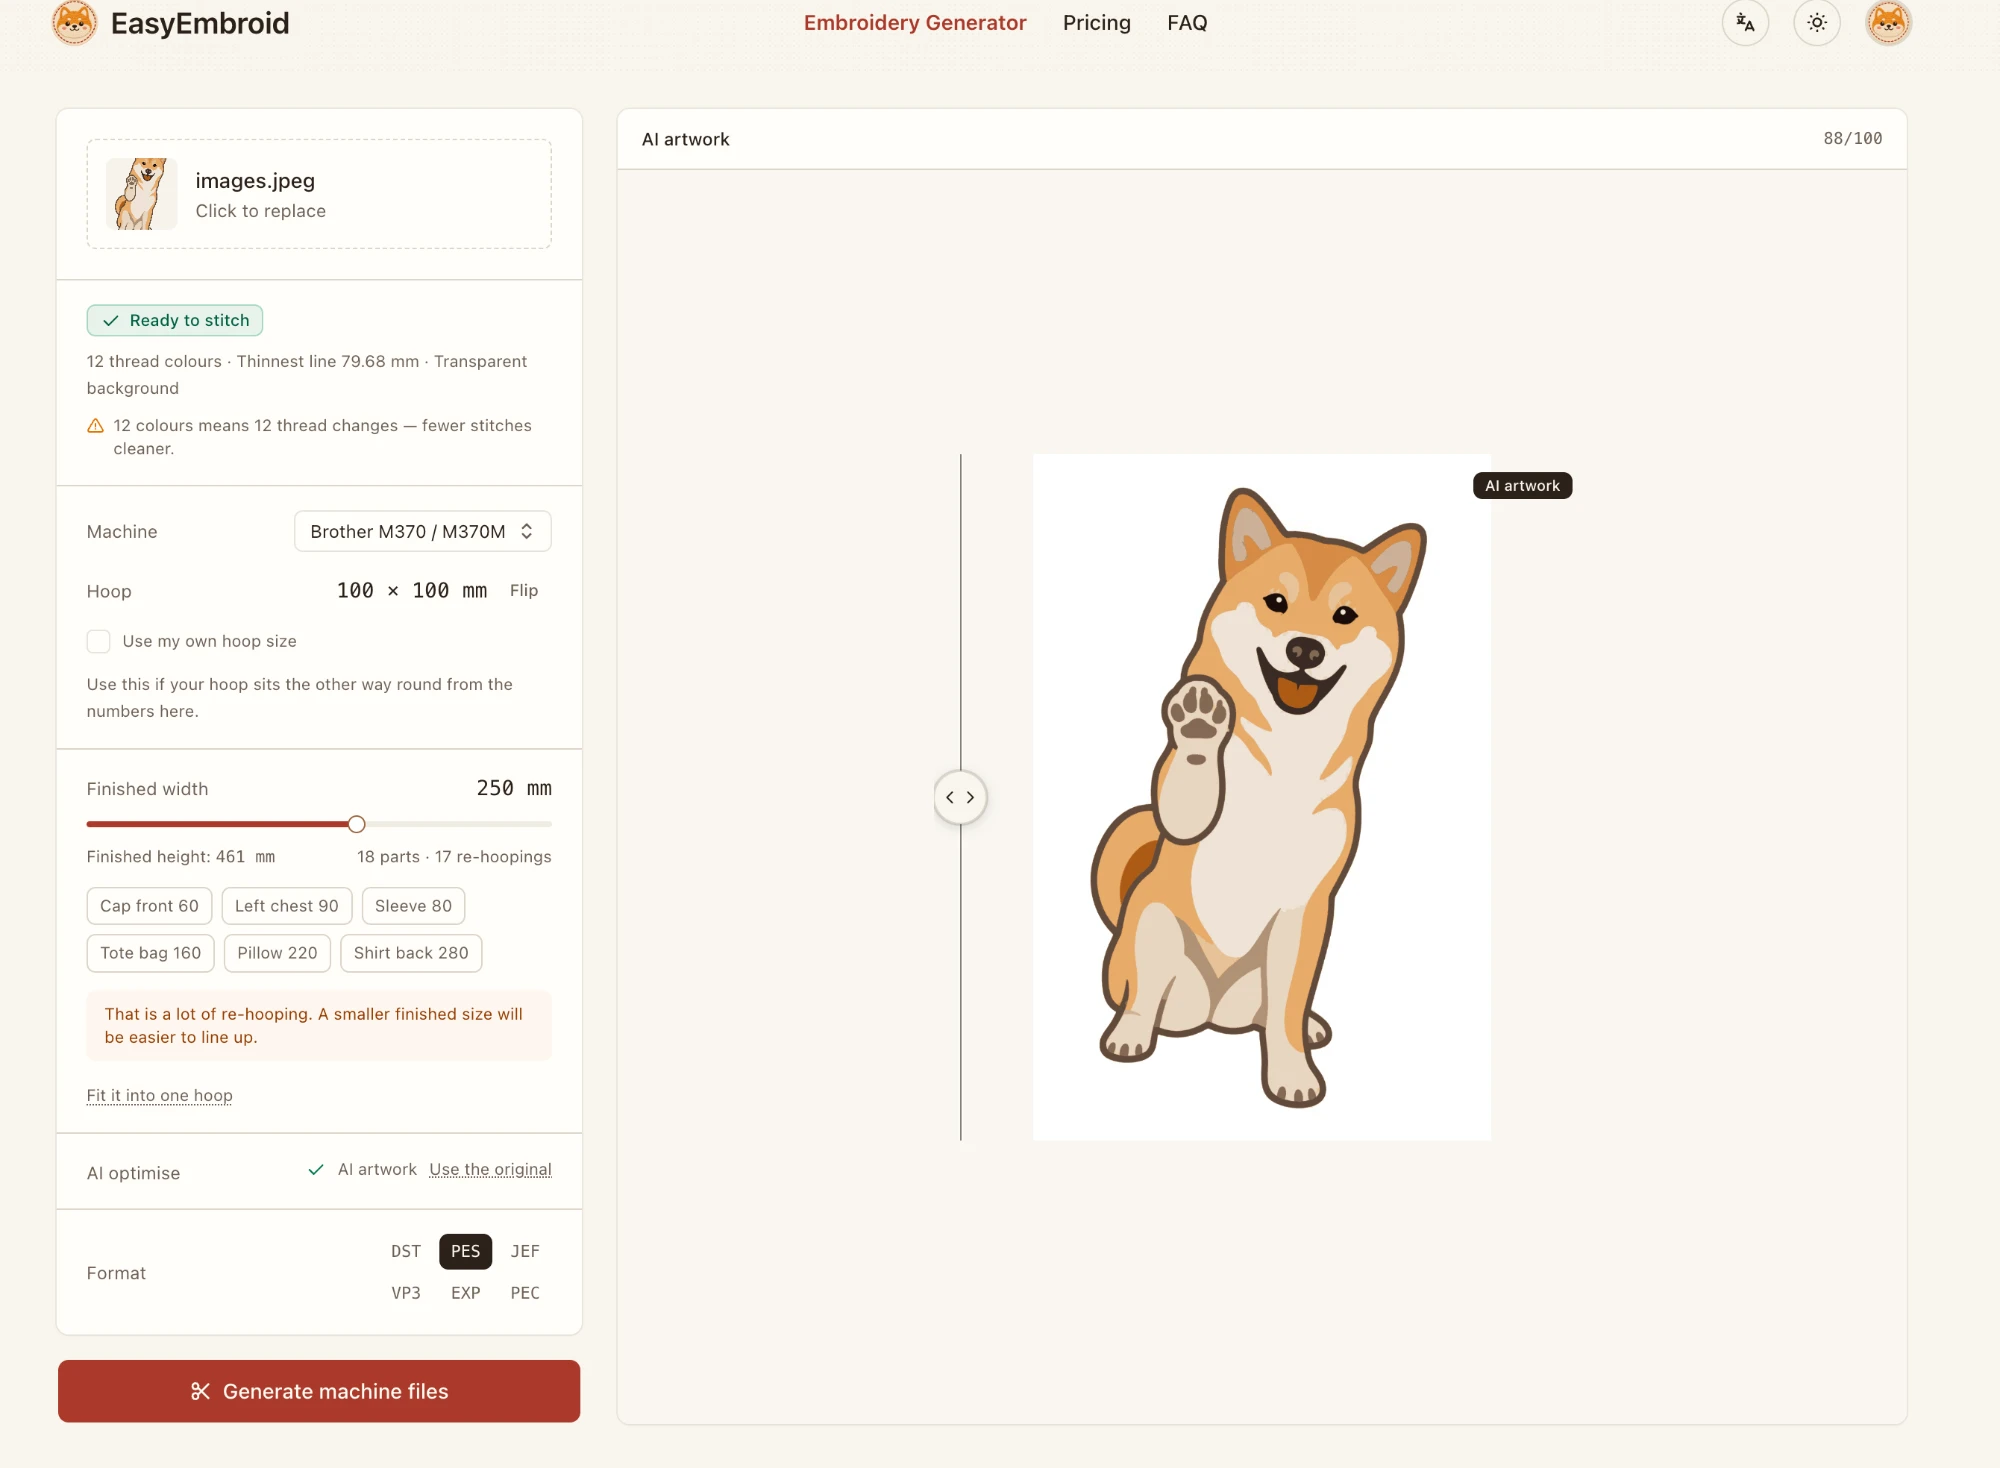
The original photo and the AI artwork. The flat version has fewer colours and a cleaner edge.
EasyEmbroid runs this check before it generates a file and measures the score at the finished size you choose. You can compare sizes before you spend a try. The report also names the reason when a picture is not ready: too many colours, a photo-like image, or strokes below the needle's limit.
How many parts will your design need?
The part count follows the finished size and the hoop. At 250 mm wide, the planner reported 18 parts and 17 re-hoopings, and it warned that the job was too much work. At 80 mm wide, the same design became 2 parts with 1 re-hooping and a 10 mm overlap.
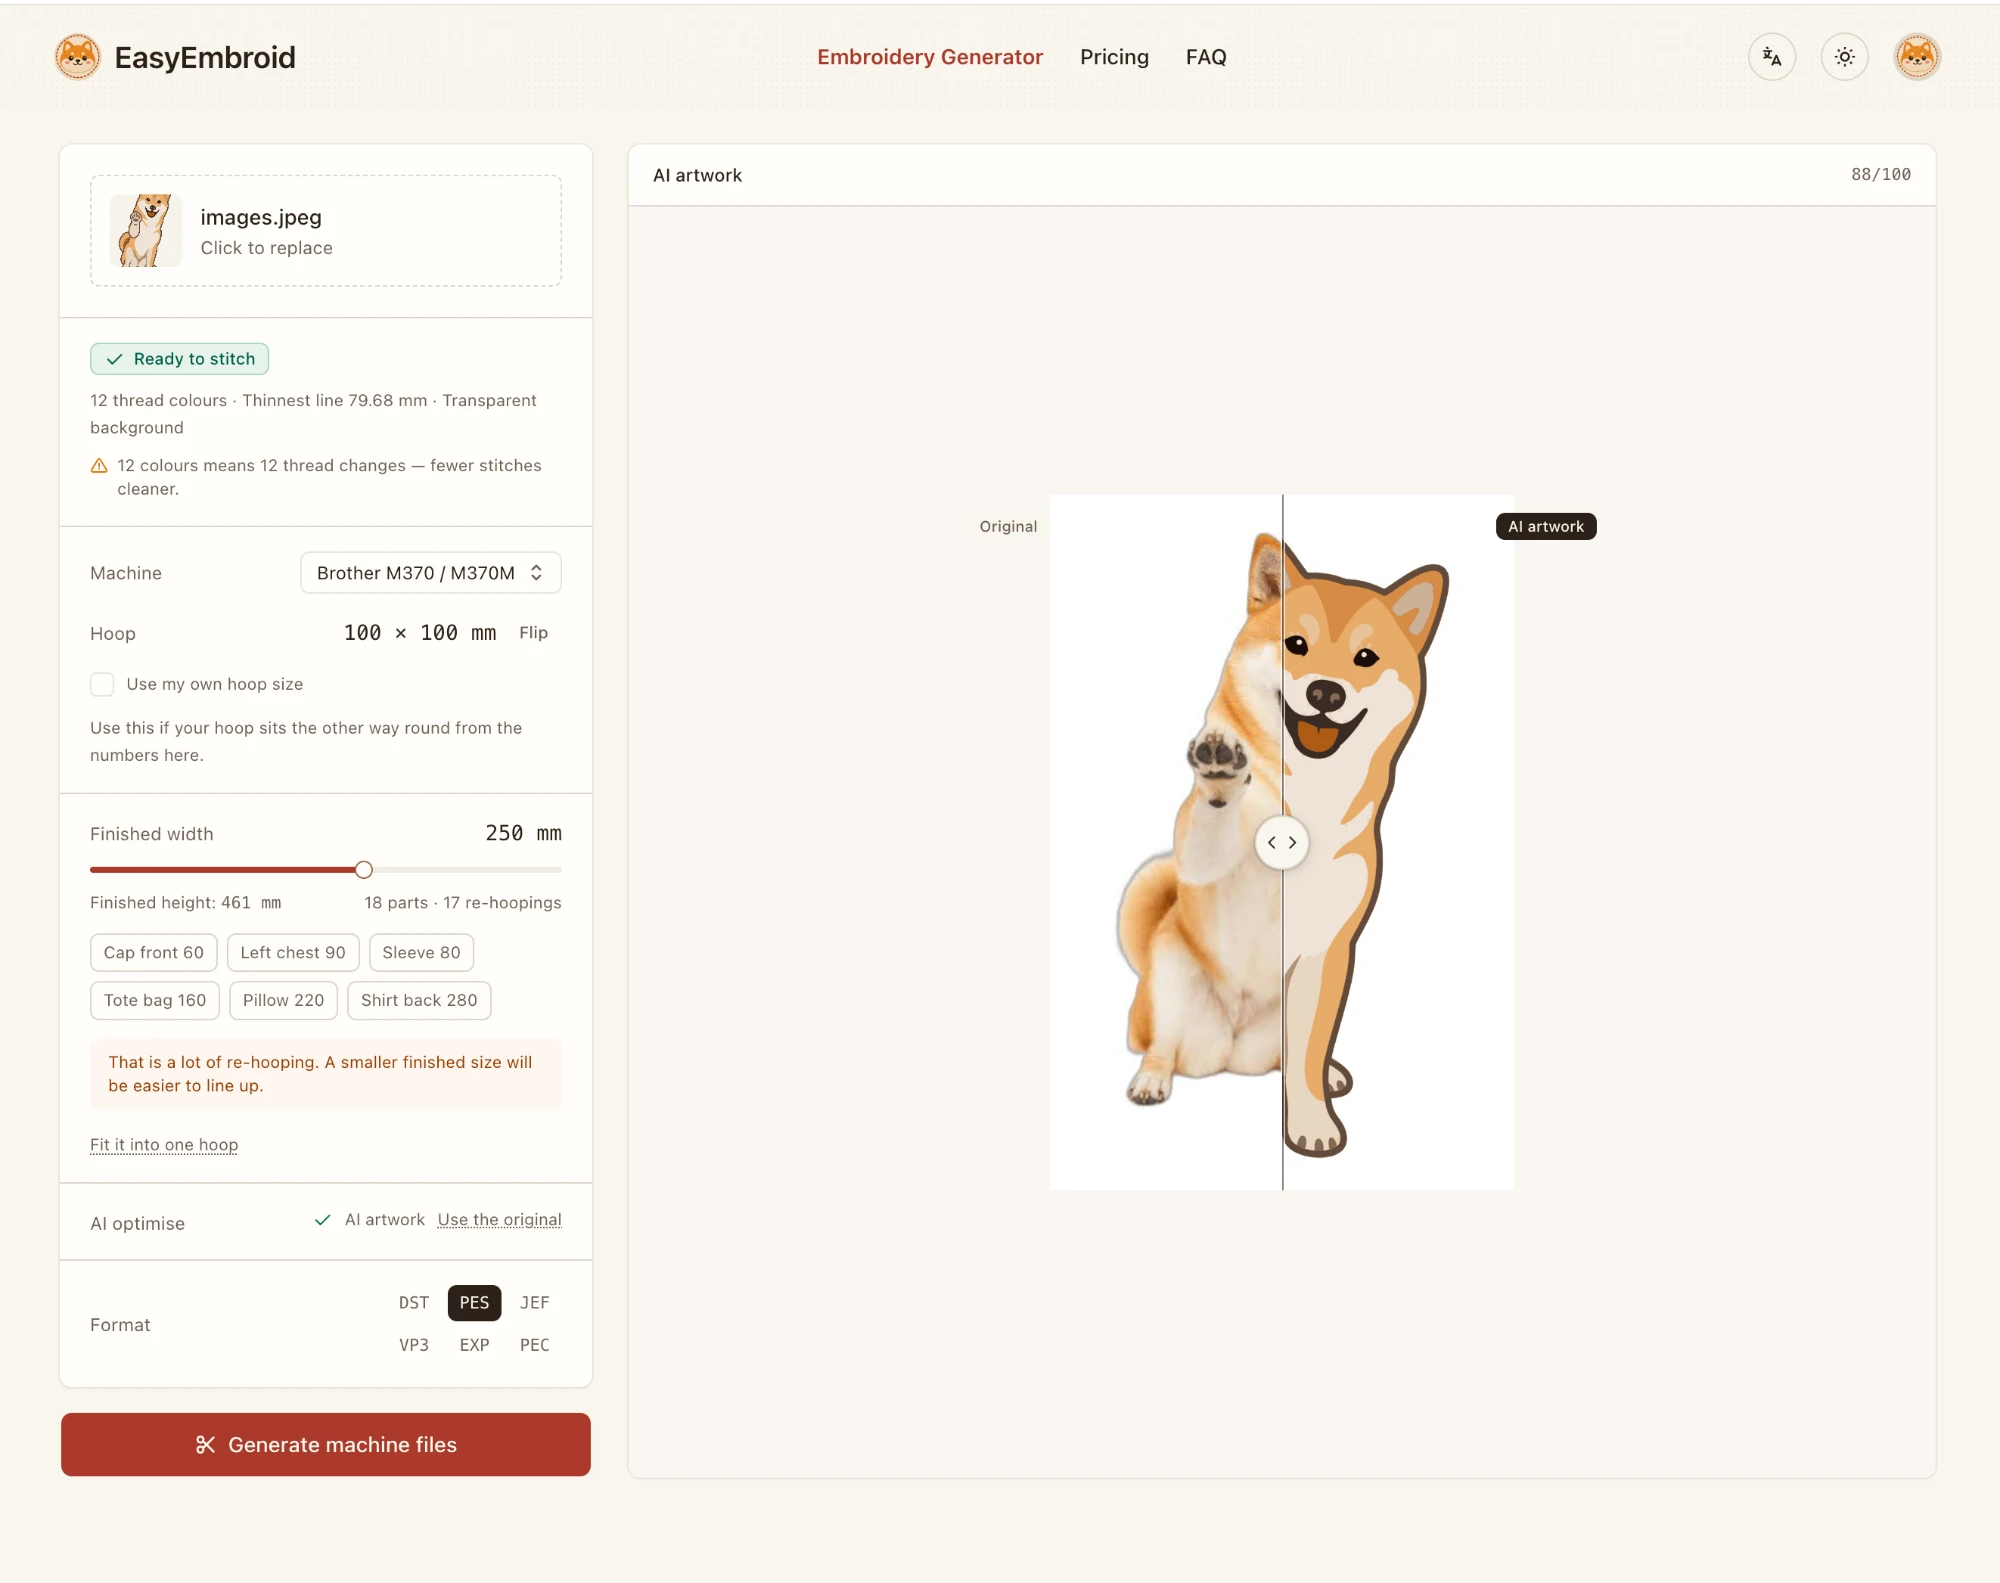
At 250 mm wide, the same picture needs 18 parts. The warning is the useful part of this screen.
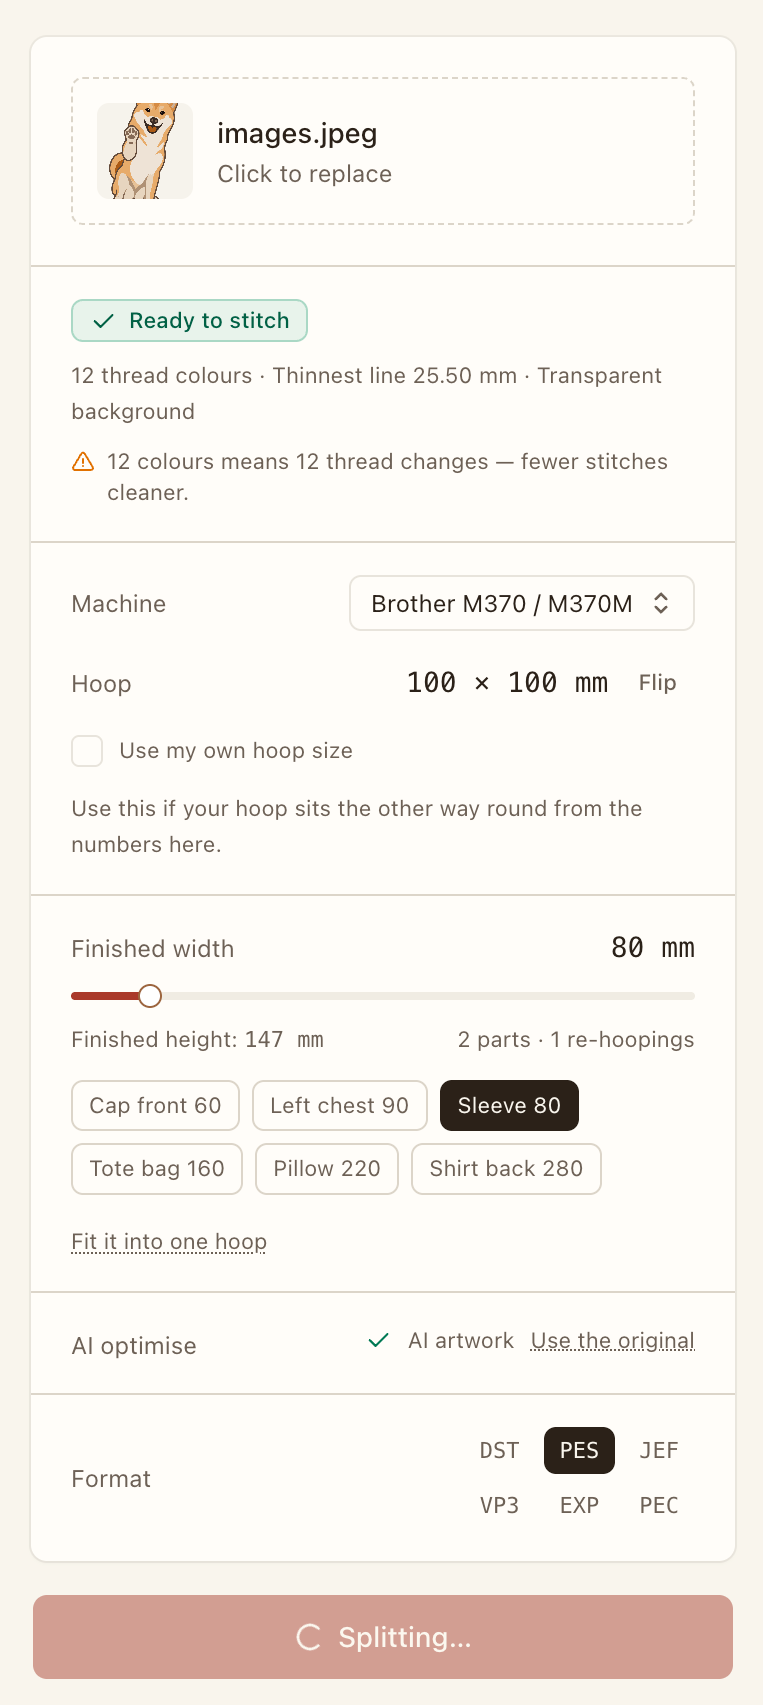
At 80 mm wide, the same picture needs 2 parts. The width slider shows the count while you move it.
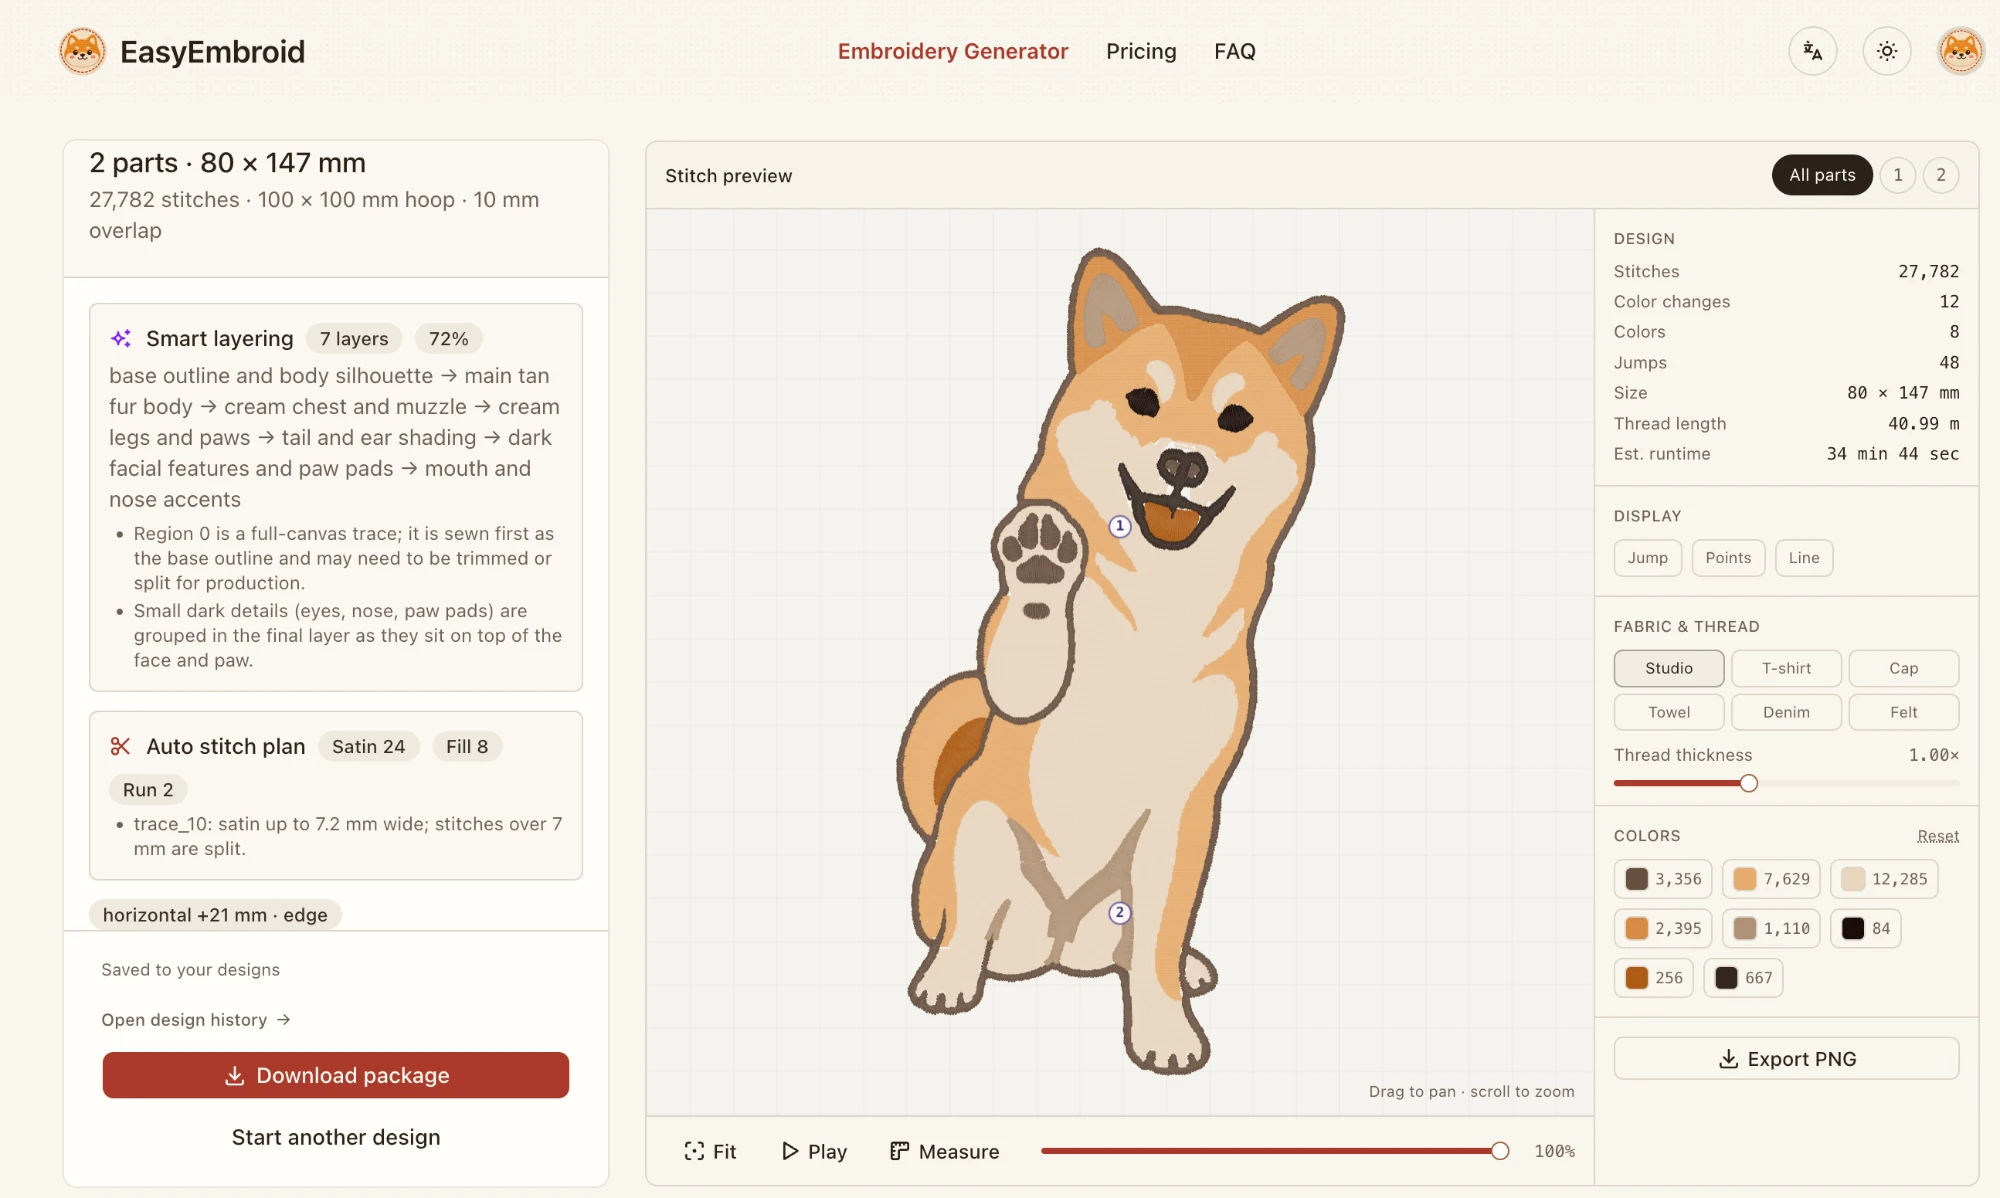
The finished 80 × 147 mm job came to 27,782 stitches, 12 colour changes, 8 thread colours and 48 jumps. The thread length was 40.99 m, and the estimated runtime was 34 minutes 44 seconds. Part 1 held 18,706 stitches in 9 colours. Part 2 held 9,076 stitches in 5 colours.
In EasyEmbroid, the size step shows the part count while you move the width slider. It warns when the count gets high, and it offers a one-hoop size if the artwork allows it. One design counts once, no matter how many parts it becomes.
Two rules of thumb help before you commit:
- For a first multi-part project, aim for 2 to 4 parts. This case sits at the easy end: 2 parts, one re-hooping.
- If the planning screen says the job needs a lot of re-hooping, believe it. A smaller finished size is easier to line up than a large one with 18 seams.
The trade-off is real. A smaller design needs fewer parts, but it only works when the artwork still reads at that size. Pick the smallest size that passes the check, not the smallest number the slider allows.
How do you split a design without cutting through the wrong place?
A good split follows the artwork. It breaks the design at object boundaries, so a body stays with a body and a background shape is not sliced through its middle. The 100 mm hoop still forces horizontal and vertical cut lines, but the tool can move those lines to quieter parts of the image.
The tool should classify every cut. A cut through empty space is a gap and usually disappears. A cut along the edge of a shape is manageable. A cut straight through the pattern, especially across a face or lettering, will probably show as a seam.
In this design, the split had one horizontal cut at +21 mm, and the tool marked it as an edge cut. The result page also shows the smart layering plan: 7 layers, with the base outline and body silhouette first, then the main fur, chest and paws, and the dark facial details last. The auto stitch plan used 24 satin regions, 8 fill regions and 2 run lines.
The result page: 2 parts, one cut, and the stitch preview.
EasyEmbroid splits at object boundaries and labels each cut as a gap, an edge, or a cut through the pattern. It warns when a cut crosses lettering or a face. That warning is the most useful item on the screen. If you can move a cut by changing the finished size or by simplifying the artwork, do it before you sew.
How do you line the parts up when you re-hoop?
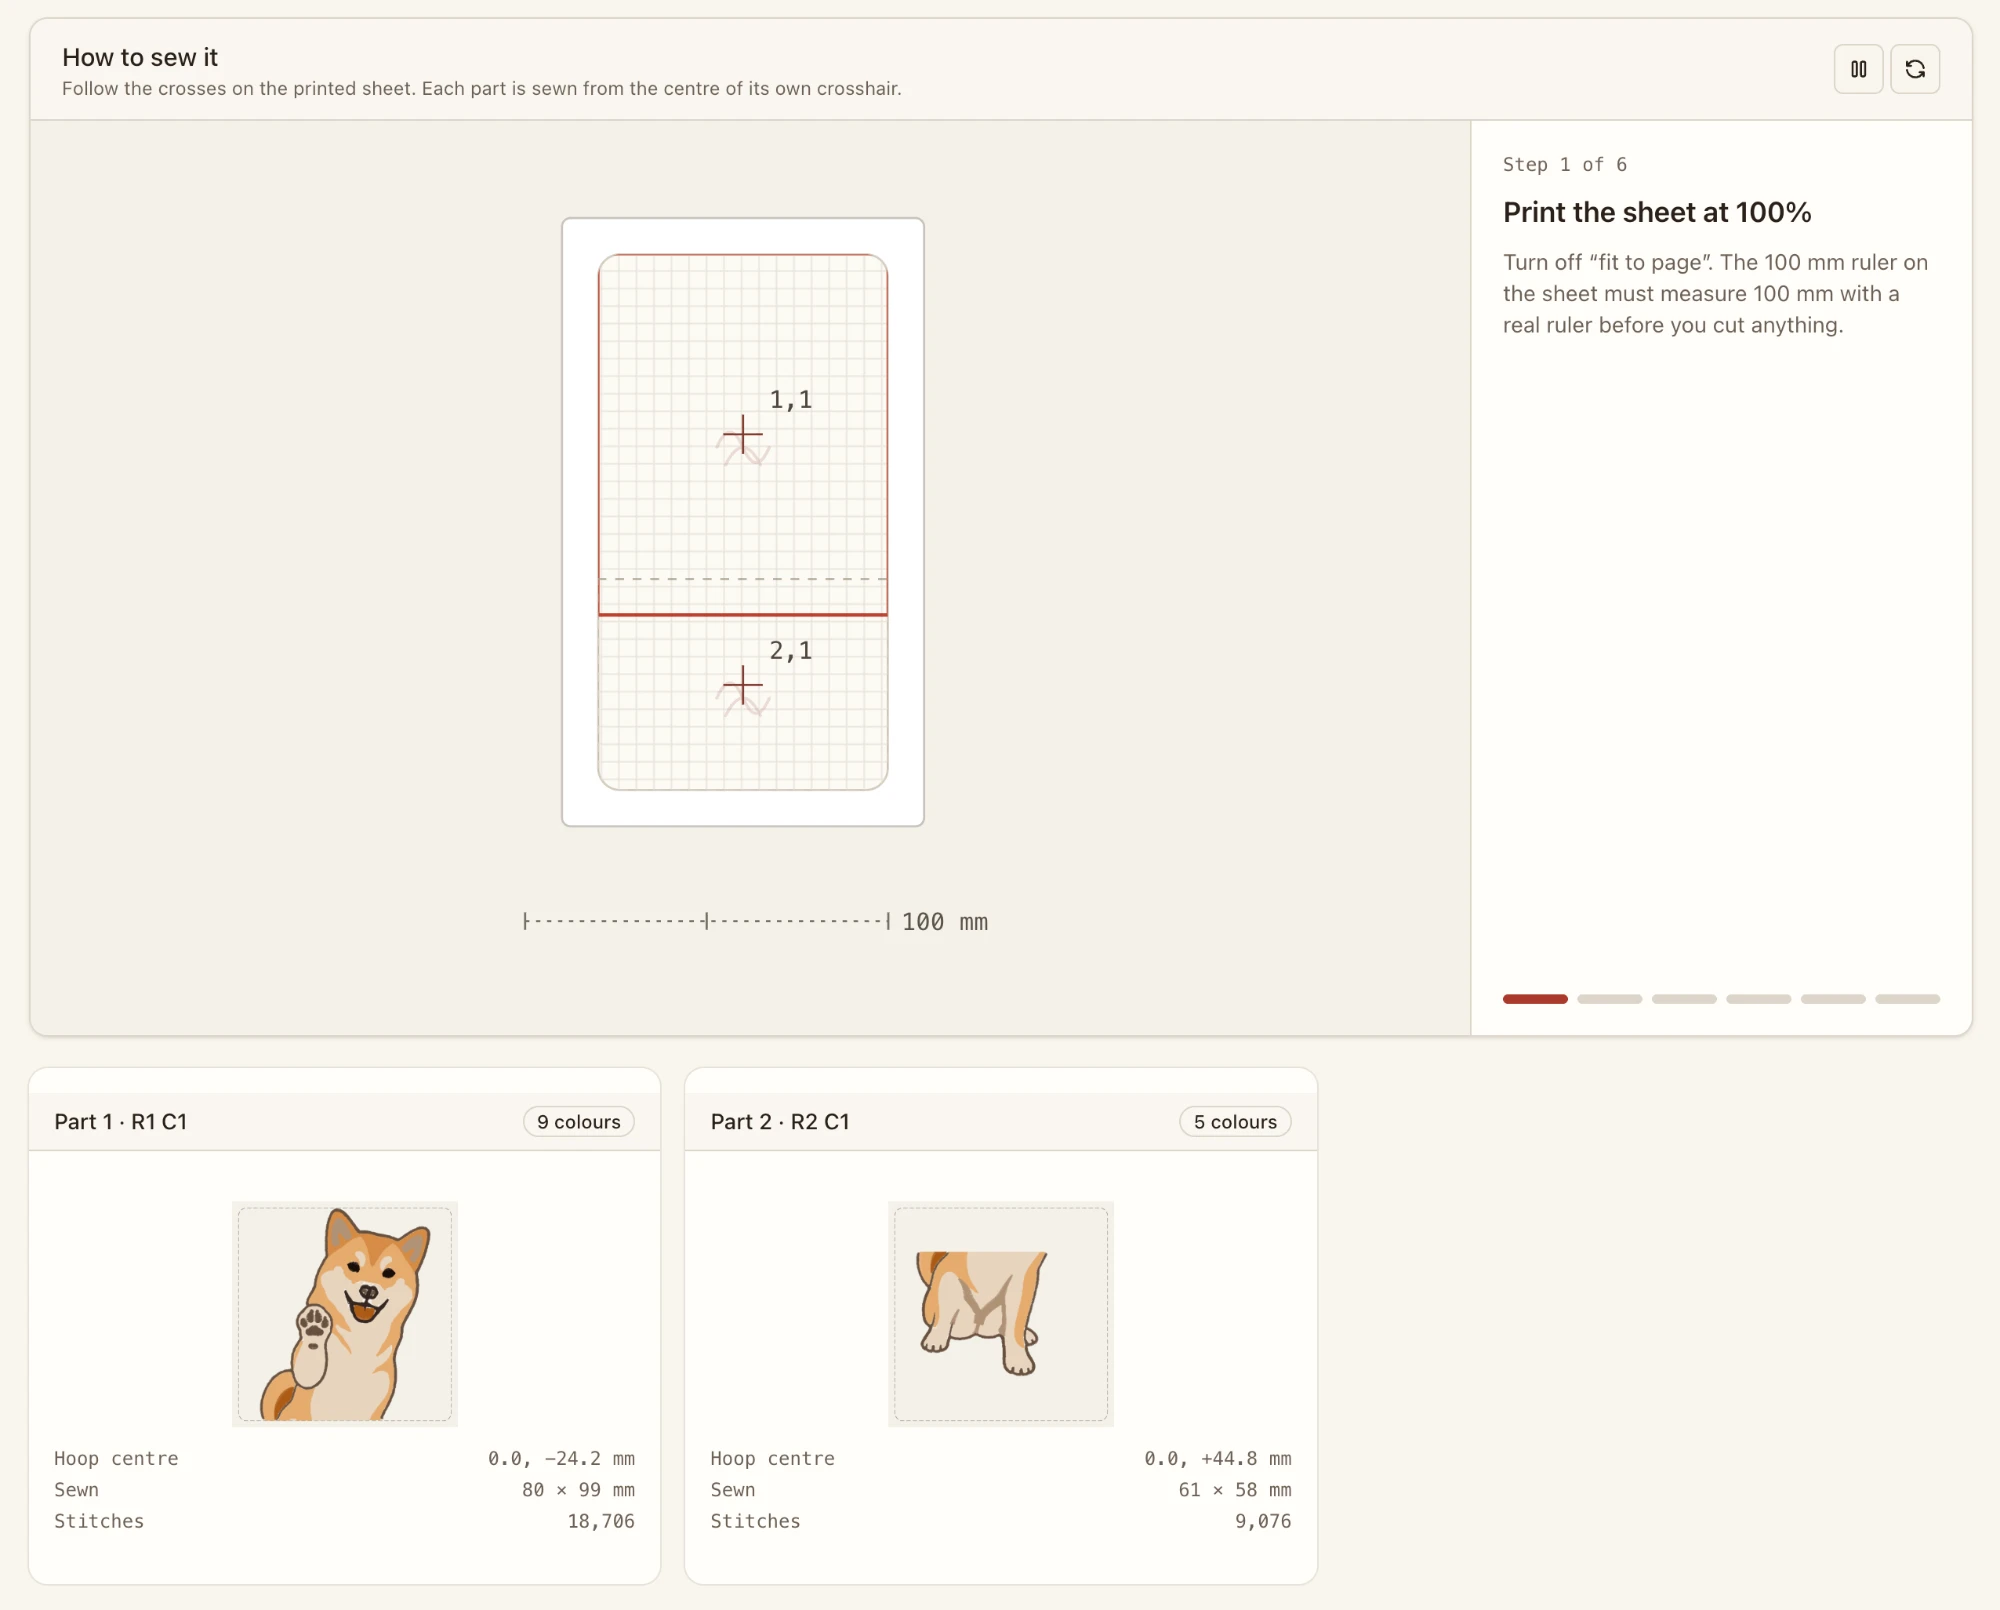
The placement sheet makes or breaks the job. Print it at 100%, with "fit to page" turned off. Check the 100 mm ruler on the sheet with a real ruler before you cut anything. If the ruler is wrong, every part will be wrong by the same proportion.
Sew each part from the centre of its own crosshair. For this design, part 1 sits at a hoop centre of 0.0, -24.2 mm and part 2 at 0.0, +44.8 mm. The README lists the same numbers. Mark the centre of the fabric, hoop it, and sew the numbered part. Then re-hoop for the next part and line up the new crosshair with the marks on the fabric. Keep the same stabilizer, hoop tension and fabric orientation for every part.
Print the placement sheet at 100%. Each part starts from the centre of its crosshair.
The full stitch preview from this job:
The video plays the complete stitch order, all 27,782 stitches, before you download.
Sew in the numbered order. Later parts overlap earlier ones, so the joins have a better chance of hiding.
When should you not split the design?
Split the design when it is too large for the hoop and still readable at that size. Do not split it in a few common cases:
- The design is a simple logo or a short word. Fit it into one hoop at 90 mm. A single hooping beats four seams.
- The artwork is a raw photo. At 250 mm this design needed 18 parts, and at 55 mm the details would not survive. The AI redraw is what made the 80 mm version work.
- The design has fine lettering. Lettering is the first thing to break at a seam. Keep text inside one part, even if that means changing the layout.
- You need the finished piece this week. Two parts at 34 minutes is manageable. Eighteen parts is not.
EasyEmbroid offers the one-hoop size directly when the artwork allows it. For a busy photo, the free quick fix removes the background and flattens close shades without dropping distinct colours. When you switch on the optional AI redraw, it can simplify the artwork before the split. Both options reduce the part count before you generate.
What should you check before you start sewing?
Run the suitability check at the finished size you want, not at the size you uploaded. Check the score, the colour count, the thinnest line and any photo warning. Then check the practical side:
- Stabilizer: use enough for the whole design, not just one part. You will hoop the fabric several times.
- Needle and thread: match the fabric. A fresh needle matters more on a long job.
- Test sew: sew part 1 on scrap fabric before you commit the garment.
- Hoop field: confirm the machine's field is 100 × 100 mm and that your hoop is the one the machine expects.
- Time: 27,782 stitches at about 35 minutes is a planning number. Give yourself room.
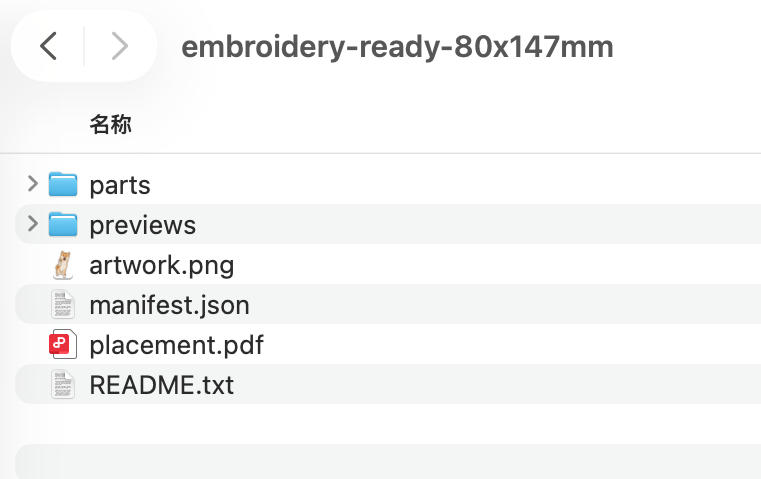
The ZIP holds two PES parts, per-part previews, the artwork, the placement sheet and a manifest.
Before you download, EasyEmbroid lists the output formats. PES is the default for the Brother models. The tool also writes DST, JEF, VP3, EXP and PEC. The ZIP holds the machine files, per-part previews, the artwork and the placement sheet. A manifest carries the cut and part data, and a README repeats the sew order and the hoop centre offsets.
The short version
A small home machine can sew large designs. It cannot hold one in a single hooping. Split the artwork at object boundaries. Print the placement sheet at 100% and sew the parts in order. Accept that a seam may show where the design is densest.
Start smaller than you think you need. A project with two to four parts teaches you the process without turning a weekend into a re-hooping marathon. This Shiba case is a good first target: a photo, an AI redraw, a two-part split, and one re-hooping.
If you want to try it on your own picture, the tool is at easyembroid.com/tools/embroidery-digitizing.